Golf Alignment Stick Drills: 7 Simple Exercises to Improve Your Swing

You can spend hours at the driving range and still feel like your golf swing is going nowhere. One day you stripe the ball straight down the fairway. The next, you’re fighting a slice, inconsistent contact, or shots that start nowhere near the target.
The problem isn’t always your swing speed or the clubs in your bag. Sometimes, your practice simply isn’t giving you enough feedback.
That’s where golf alignment stick drills can make a real difference.
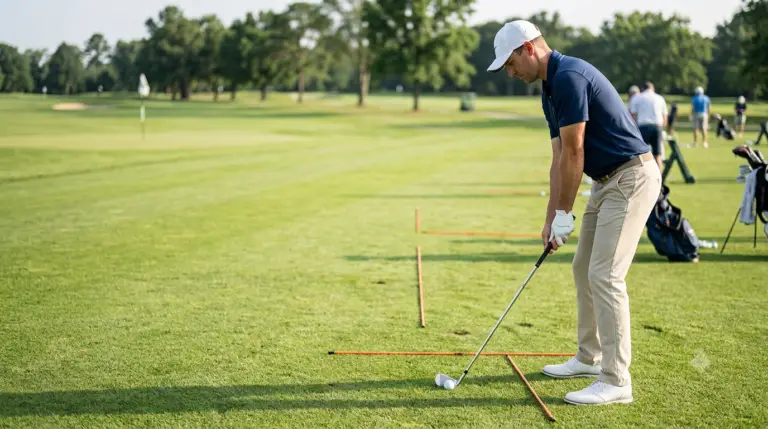
Alignment sticks are among the simplest training aids you can carry in your golf bag. They cost little, take up almost no space, and can help you work on alignment, ball position, swing path, takeaway, rotation, and impact. More importantly, they give you something visible to react to instead of relying entirely on feel.
In this guide, you’ll learn seven practical golf drills with alignment sticks that you can use at the range, on the practice area, or even at home when you have enough space.
Table of Contents
What Are Golf Alignment Stick Drills?
Golf alignment stick drills are practice exercises that use one or more alignment sticks to create visual or physical reference points during your swing.
Instead of simply hitting ball after ball, you use the sticks to check whether your setup and movement match the intention of the drill.
You can use alignment sticks to help you:
- Aim your clubface and body correctly.
- Improve ball position.
- Develop a more consistent takeaway.
- Understand your swing path.
- Build awareness of the swing plane.
- Practice body rotation.
- Develop a balanced impact and finish position.
The biggest advantage is feedback. If your alignment stick setup shows that you’re aiming left, positioning the ball too far forward, or sending the club outside your intended path, you can see the problem rather than guessing.
Why Are Alignment Sticks So Useful for Golf Practice?
Alignment sticks are particularly useful because they turn abstract swing concepts into something you can see.
For example, “swing along the correct path” can be difficult to understand when you’re only thinking about the club. A pair of sticks can create a simple gate that gives you a physical reference.
They also work for almost every level of golfer.
If you’re a beginner, they can help you learn reliable setup fundamentals. If you’re an experienced golfer, they can provide a useful way to rehearse a specific movement without hitting hundreds of balls.
7 Golf Alignment Stick Drills to Improve Your Swing
The following drills cover different parts of your golf swing. You don’t need to perform all seven during every practice session.
Instead, choose the exercises that address your biggest weaknesses and give yourself enough repetitions to understand the movement.
| Drill | Main Focus | Recommended Level |
|---|---|---|
| Alignment Gate Drill | Aim and alignment | Beginner |
| Ball Position Drill | Setup consistency | Beginner |
| Takeaway Guide Drill | Takeaway | Beginner/Intermediate |
| Swing Path Gate Drill | Club path | Intermediate |
| Swing Plane Drill | Swing movement | Intermediate |
| Hip Rotation Drill | Body rotation | Intermediate |
| Impact & Follow-Through Drill | Contact and balance | All levels |
1. Alignment Gate Drill: Improve Your Aim
Poor alignment can cause problems before your club even starts moving.
You may feel as though you’re aiming directly at the target while your feet, hips, shoulders, or clubface are pointing somewhere else.
The alignment gate drill gives you an easy visual reference.
How to Do the Alignment Gate Drill
- Choose a specific target on the range.
- Place one alignment stick on the ground pointing toward your target.
- Place the second stick parallel to the first to create a reference for your stance.
- Position the clubface relative to the target line.
- Set your feet, hips, and shoulders parallel to the reference.
- Hit several controlled shots.
- Remove the sticks and see whether you can reproduce the same setup.
Don’t rush this drill. Spend time simply standing behind the ball and checking your intended target line.
Your goal is to make correct alignment feel familiar.
Common Mistake
Don’t confuse aiming the clubface directly at the target with aiming your body directly at the target. Your body normally works from a position parallel to the target line rather than pointing straight at it.
2. Ball Position Drill: Build a More Consistent Setup
Your ball position affects where the club meets the ball during the swing.
If the ball keeps moving around your stance, your swing may have to compensate from shot to shot.
An alignment stick gives you a simple reference that makes ball position easier to repeat.
How to Practice
Place an alignment stick on the ground across your stance. Use it as a reference for where the ball sits relative to your feet.
Practice with different clubs and pay attention to the changes.
As a general starting point:
- Driver: farther forward in your stance.
- Fairway wood: generally forward of center.
- Mid-irons: around the center area.
- Short irons: generally closer to the center.
- Wedges: commonly near the center.
These are guidelines rather than rigid rules. Your ideal ball position can vary according to your technique, posture, club, and coaching approach.
Why This Drill Matters
A repeatable setup reduces the number of variables you have to manage during your swing.
If your ball position changes significantly every time you change clubs, consistent contact becomes much harder to achieve.
3. Takeaway Guide Drill: Improve Your First Move
The takeaway is the beginning of your backswing, and it can influence everything that follows.
If the club immediately moves dramatically inside or outside your intended path, you may spend the rest of the swing compensating.
The takeaway guide drill helps you become more aware of those first few feet of movement.
How to Do It
- Set up normally.
- Place an alignment stick on the ground as a visual reference.
- Start the club backward slowly.
- Watch how the clubhead and hands move.
- Stop after the initial takeaway.
- Return to the starting position.
- Repeat several times before hitting a ball.
Once the movement becomes familiar, make small swings and gradually increase the length.
The objective isn’t to force your club into one “perfect” position. Golf swings vary between players because of differences in body proportions, posture, mobility, and technique.
Instead, use the stick as feedback.
4. Swing Path Gate Drill: Train a More Consistent Path
If you struggle with a slice, pull, push, or inconsistent ball flight, your club path may deserve attention.
The swing path gate drill uses two alignment sticks to create a narrow visual corridor.
How to Set It Up
Place two alignment sticks on the ground so they form a gate through which your club can move.
The gate should be wide enough to allow a natural motion without forcing you to manipulate the club.
Start with half-swings.
If your club repeatedly contacts one of the sticks, that’s immediate feedback that your movement isn’t matching the intended corridor.
Common Mistakes
Avoid making the gate extremely narrow.
The goal isn’t to scare yourself into keeping the club perfectly between two sticks. It’s to develop awareness of your movement.
Also avoid trying to manufacture an exaggerated inside-to-outside or outside-to-inside motion simply because you want to change your ball flight.
If you’re working on a persistent swing-path issue, video feedback or guidance from a qualified golf instructor can be more useful than blindly changing your mechanics.
5. Swing Plane Drill: Develop Better Swing Awareness
The swing plane is one of those golf concepts that can sound complicated when explained only with words.
An alignment stick can give you a physical reference for the general plane you’re rehearsing.
How to Practice the Plane Drill
- Establish your normal setup.
- Position an alignment stick safely as a visual reference.
- Make slow practice swings.
- Pay attention to how your club moves relative to the reference.
- Repeat the movement several times.
- Gradually increase your swing speed.
The important word here is awareness.
Don’t assume that every golfer should place the club in exactly the same positions. Your ideal movement can depend on your build, club length, posture, grip, and natural swing.
Safety First
Never position an alignment stick somewhere that could cause injury if you accidentally strike it.
Start slowly and make sure you have sufficient space before progressing to faster swings.
6. Hip Rotation Drill: Improve Your Body Turn
Your arms aren’t the only parts of your body involved in the golf swing.
Rotation through your torso and hips contributes to how you create and transfer movement.
The hip rotation drill helps you become more conscious of that movement without worrying about hitting a ball.
How to Perform It
Place an alignment stick across your shoulders and hold it comfortably.
Then:
- Set your normal golf posture.
- Rotate your upper body away from the target.
- Maintain your posture as you turn.
- Return toward the target.
- Finish in a balanced position.
- Repeat slowly.
Focus on rotation rather than simply sliding from side to side.
You don’t need to turn as far as physically possible. A controlled movement that you can repeat is more useful than forcing an enormous backswing.
Make It More Golf-Specific
After several slow repetitions, pick up a club and make small swings while trying to reproduce the same feeling.
This creates a bridge between a movement drill and your actual golf swing.
7. Impact & Follow-Through Drill: Finish Under Control
The final drill focuses on what happens around impact and through the follow-through.
You don’t need to freeze yourself into a particular “perfect” impact position. Instead, use the alignment stick as a reference while developing awareness of your balance, rotation, and finish.
How to Practice
- Start with short swings.
- Make controlled contact.
- Allow your body to rotate naturally toward the target.
- Finish in balance.
- Hold your finish for a few seconds.
- Repeat before gradually increasing swing length.
A balanced finish can provide useful information about the quality of your movement.
If you regularly fall backward, lose your balance, or finish differently on every swing, slow the exercise down and focus on control.
How to Use Golf Alignment Stick Drills in Your Practice Routine
Knowing several drills is useful, but randomly jumping between exercises isn’t necessarily the best way to practice.
Instead, create a short routine with a clear purpose.
A 20-Minute Alignment Stick Practice Routine
| Time | Exercise | Purpose |
|---|---|---|
| 3 minutes | Alignment drill | Establish your target line |
| 3 minutes | Ball position | Improve setup consistency |
| 4 minutes | Takeaway drill | Reinforce the first movement |
| 4 minutes | Swing path drill | Develop path awareness |
| 3 minutes | Impact drill | Improve contact and balance |
| 3 minutes | Normal swings | Transfer the feeling |
Start with rehearsals before hitting balls.
For example, you might make five slow takeaway repetitions, followed by five half-swings, and then hit a few normal shots.
This gives your brain a chance to understand the movement before you add the complexity of a full-speed swing.
How Many Repetitions Should You Do?
There isn’t a magic number that guarantees improvement.
Quality matters more than simply accumulating repetitions.
Try this approach:
- Begin with slow movements.
- Perform small sets.
- Check your setup regularly.
- Hit fewer balls with more purpose.
- Stop if your technique becomes sloppy.
- Test the movement with normal swings.
If you’re exhausted and simply repeating a poor movement, additional repetitions may not help.
Common Mistakes When Using Alignment Sticks
Alignment sticks are simple, but you can still use them incorrectly.
Using Too Many Training Aids
You don’t need six sticks, a swing analyzer, three cameras, and ten different drills to practice effectively.
Choose one problem and work on it.
Practicing Too Fast
Speed can hide mistakes.
Begin slowly enough that you can actually notice what your body and club are doing.
Trying to Copy a Perfect Swing
There isn’t one universal golf swing that every player must reproduce.
Use alignment sticks to create feedback rather than forcing your body into a position that doesn’t suit you.
Ignoring Safety
Always consider where the stick is positioned and what could happen if your club hits it.
Keep adequate space around you and don’t swing aggressively around a stick placed close to your body.
Golf Alignment Stick Drills for Different Skill Levels
You don’t need to master every drill immediately.
Best Drills for Beginners
If you’re new to golf, start with:
- Alignment Gate Drill
- Ball Position Drill
- Takeaway Guide Drill
These exercises help establish basic awareness before you move into more technical practice.
Best Drills for Intermediate Golfers
Once your setup is relatively consistent, add:
- Swing Path Gate Drill
- Swing Plane Drill
- Hip Rotation Drill
- Impact & Follow-Through Drill
At this stage, recording your swing occasionally can help you compare what you feel with what you’re actually doing.
When to Consider a Golf Lesson
Alignment sticks are training tools, not substitutes for professional instruction.
If you have a persistent slice, hook, poor contact, or another problem that doesn’t improve despite practice, a qualified instructor can help identify the underlying cause.
Golf Alignment Stick Drills vs. Practicing Without Training Aids
Alignment sticks aren’t designed to replace every other form of practice.
Different methods give you different types of feedback.
| Practice Method | Feedback | Convenience | Best Use |
|---|---|---|---|
| Alignment sticks | Visual and physical | Excellent | Technical practice |
| Driving range | Ball-flight feedback | Good | Testing shots |
| Video analysis | Visual swing feedback | Excellent | Reviewing mechanics |
| Golf lesson | Personalized | Depends | Fixing specific issues |
| On-course practice | Real-game feedback | Lower | Applying skills |
A balanced practice plan can combine several of these methods.
You might use alignment sticks to rehearse your setup, hit balls at the range to observe the result, record a few swings, and then take the improved movement onto the course.
How to Know if Your Golf Alignment Stick Drills Are Working
Improvement doesn’t always arrive as one dramatic breakthrough.
Look for smaller signs.
Your practice may be heading in the right direction if:
- Your setup becomes more consistent.
- You aim at targets more confidently.
- Your ball position stops moving around.
- Your takeaway feels less rushed.
- Your contact becomes more predictable.
- Your ball starts closer to your intended target.
- Your finish becomes more balanced.
- You can reproduce the movement without the sticks.
One of the best tests is to remove the training aid.
If your swing only works when the sticks are on the ground, you haven’t fully transferred the movement yet.
The goal is eventually to make the correct setup and movement feel natural without external assistance.
Frequently Asked Questions About Golf Alignment Stick Drills
What are the best golf alignment stick drills for beginners?
The alignment gate drill, ball position drill, and takeaway drill are excellent starting points. They address basic setup and movement without requiring advanced swing knowledge.
Can golf alignment stick drills improve your swing?
They can help you develop awareness and more repeatable movement patterns by providing visual or physical feedback. However, your results depend on how consistently and correctly you practice.
How often should you do golf alignment stick drills?
Short, regular sessions can be more useful than occasional marathon practice sessions. You can incorporate a few minutes of alignment stick work into your normal range routine.
Can you do golf alignment stick drills at home?
Yes. Many drills can be practiced at home if you have enough safe space. Rehearsal movements don’t always require a golf ball, but you should make sure your club and alignment stick cannot hit furniture, people, or other objects.
Do alignment sticks help with swing path?
Yes. Gate-style drills can give you a useful visual reference for your club’s movement. They can help you become more aware of path, although they shouldn’t be used to force a particular swing shape without understanding why you’re changing it.
How many alignment sticks do you need for golf drills?
One stick is enough for many exercises. Two sticks are more versatile because you can create alignment references and gates.
Conclusion: Turn Your Practice Into Purposeful Practice
You don’t need an expensive training system to make your golf practice more productive.
Sometimes, two simple alignment sticks can give you exactly what you’re missing: feedback.
From improving your setup with the alignment gate drill to developing better movement awareness with the swing path, plane, rotation, and impact drills, these exercises give you practical ways to work on your swing without mindlessly hitting ball after ball.
The key is to keep your practice focused.
Choose one or two areas that are holding your game back. Practice them slowly. Pay attention to what changes. Then remove the sticks and see whether you can reproduce the movement naturally.
Your next range session doesn’t have to be another bucket of balls with the same old results.
Grab your alignment sticks, choose one drill, and make your next 20 minutes of practice count.
Post Reviews
There are no reviews yet. Be the first one to write one.